In short: Facebook groups are undeniably valuable.
If you‘re interested in learning how to create a Facebook Group, you’re in the right place. We’ll also explore the differences between Facebook groups and Pages and whether or not it’s worth the effort.
Dive in from the beginning, or use the links below to jump to a section.

Should I create a Facebook group for my business?
Yes, you should create a Facebook group for your business, but it should have a purpose that makes users want to join and contribute to the conversations happening within the group.
Recently, companies have taken advantage of groups. Peloton, for instance, uses groups to connect its users and facilitate a space where people can share exercise plans, training methods, and workout schedules with one another.
Other brands, including National Geographic and Instant Pot, have followed suit, creating their own community-focused groups to inspire action, encourage engagement, and increase brand loyalty.
Even HubSpot recently created its own private group, Marketer to Marketer.
But Facebook groups should act as a way to bring your consumers directly into the fold of your brand. These groups are unique in a way that other social media platforms are not. On Instagram, Reddit, and Twitter, consumers can talk about your brand, and your brand can chime in on the conversation. But with Facebook groups, your brand is creating space and conversations for consumers to speak directly to representatives of your company. This dynamic can be powerful for a plethora of use cases.
But what a Facebook group cannot do is become a substitute for a Facebook page. To be successful in your Facebook marketing strategy, you’ll likely need both.
Facebook Group vs. Facebook Page
So what are the differences between a Facebook group and a Facebook Page.
Most businesses should have a Facebook Page. A Page is a public-facing profile to post company-relevant updates and announcements to Facebook users at-large. On the Page, you can run advertisements or sponsor posts you’ve created.
If you‘re a nonprofit organization, a Page also enables you to post a ’Donate’ button to increase donations from the Facebook community.
Considering Nearly 3 billion people are on Facebook, it’s vital that your business has a Facebook Page to increase brand awareness, advertise to new audiences, collect audience insights, and even chat with users looking for customer service.
As Gary Vaynerchuk told HubSpot’s CEO Brian Halligan, “… You can’t be alive in the game without a Facebook.”
All of which is to say: Having a Facebook Page is a requirement for getting your business active on one of the largest social media platforms.
A Facebook group, on the other hand, is much smaller-scale and typically more exclusive than a Page. For instance, with a group, you‘re able to set up open membership, membership upon approval, or even membership by invitation only. Then, once members are accepted into your group, they’re able to freely post and engage with one another.
Simply put, a Facebook Page is company-focused, while a Facebook group is community-focused.
A group is a good idea if you‘re interested in connecting your customers or leads to one another, you want to facilitate a sense of community surrounding your brand, or you’re hoping to showcase your brand as a thought leader in the industry.
However, a group is not a good idea if you want to use it to raise awareness about your products or services, or simply use it to post company announcements.
People want to join groups in which they feel a sense of belonging and connection with fellow group members, and to learn about an industry at-large—which takes effort, resources, and time to ensure your team can deliver.
If you don’t feel you have the resources to cultivate a valuable, engaging Facebook group, it might be best to wait until you do.
However, if you‘ve determined a Facebook group is the right decision for your own business, let’s explore how you can create one.
But first, for a deeper dive into why you may want to use Facebook Groups for your business, check out our video guide below:
How to Create a Facebook Group for Your Business
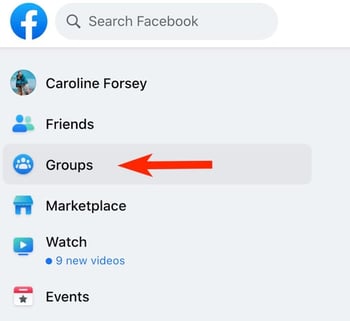
1. On your company’s Facebook homepage, click “Groups” on the left-hand side.
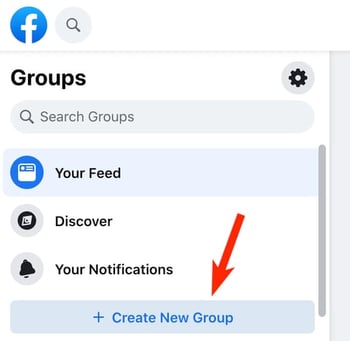
2. Click the “+ Create New Group”.
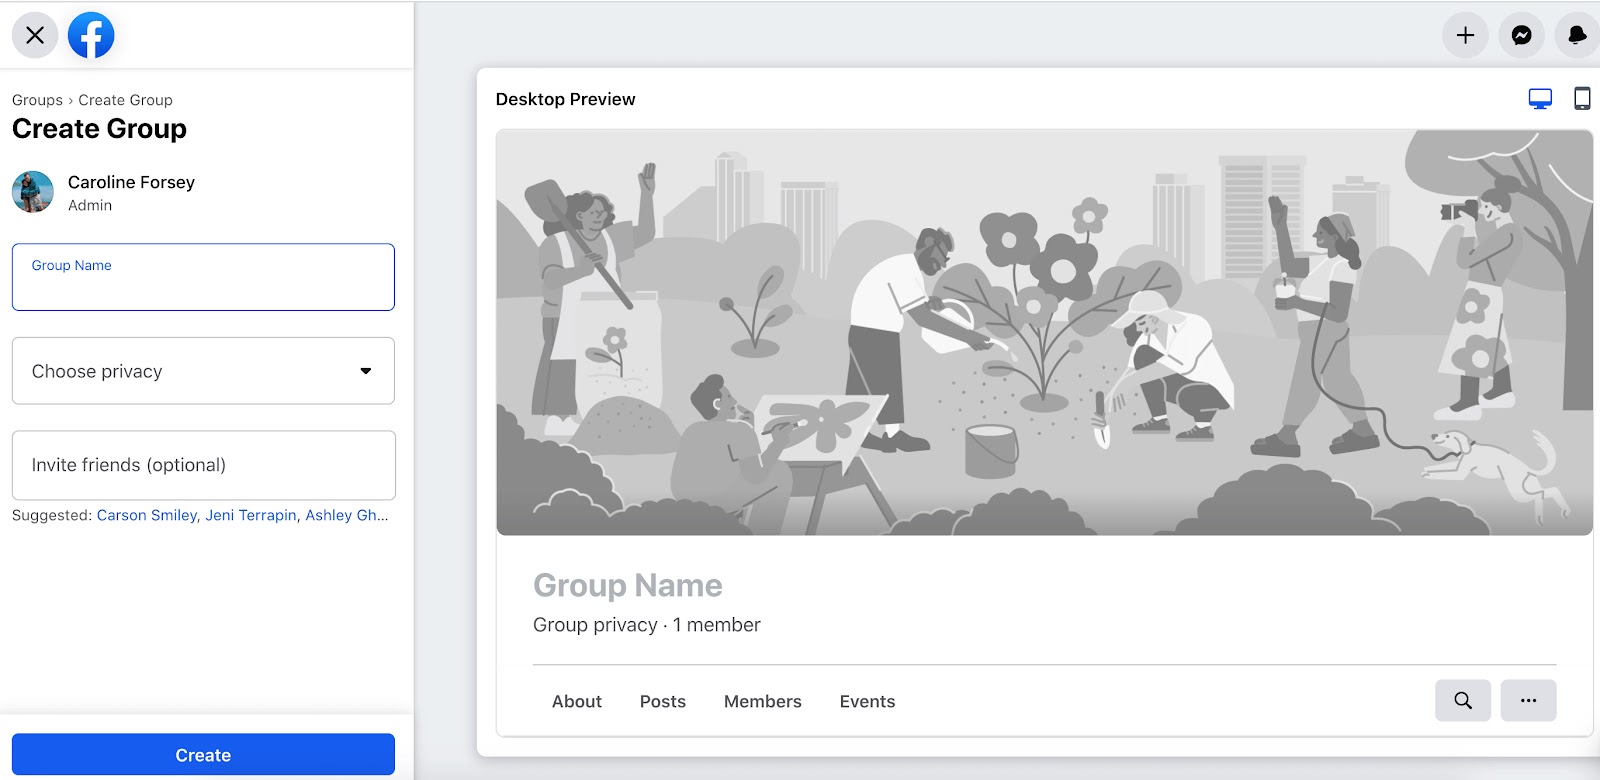
3. Type in a Group Name, and then choose your privacy (Public versus Private). You also have the option to invite Facebook friends immediately if you’d like. Then, click “Create”.
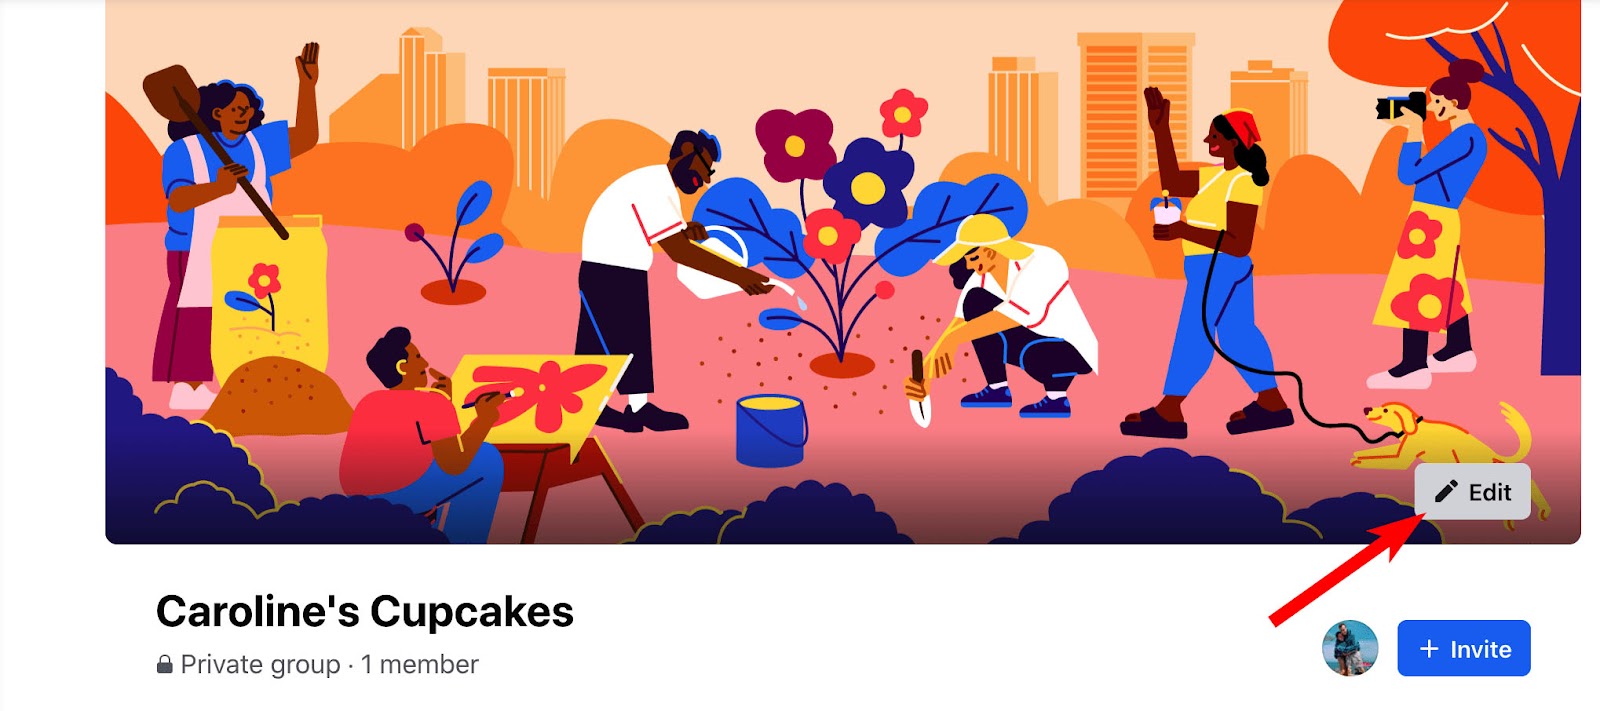
4. Click “Edit” on your cover photo to choose from Facebook photos, illustrations, or upload a photo from your computer.
5. Add a description to your Group so people know what your group is about. Additionally, if you want to create a private group for customers, you can copy-and-paste customer email addresses into your “Invite” box.
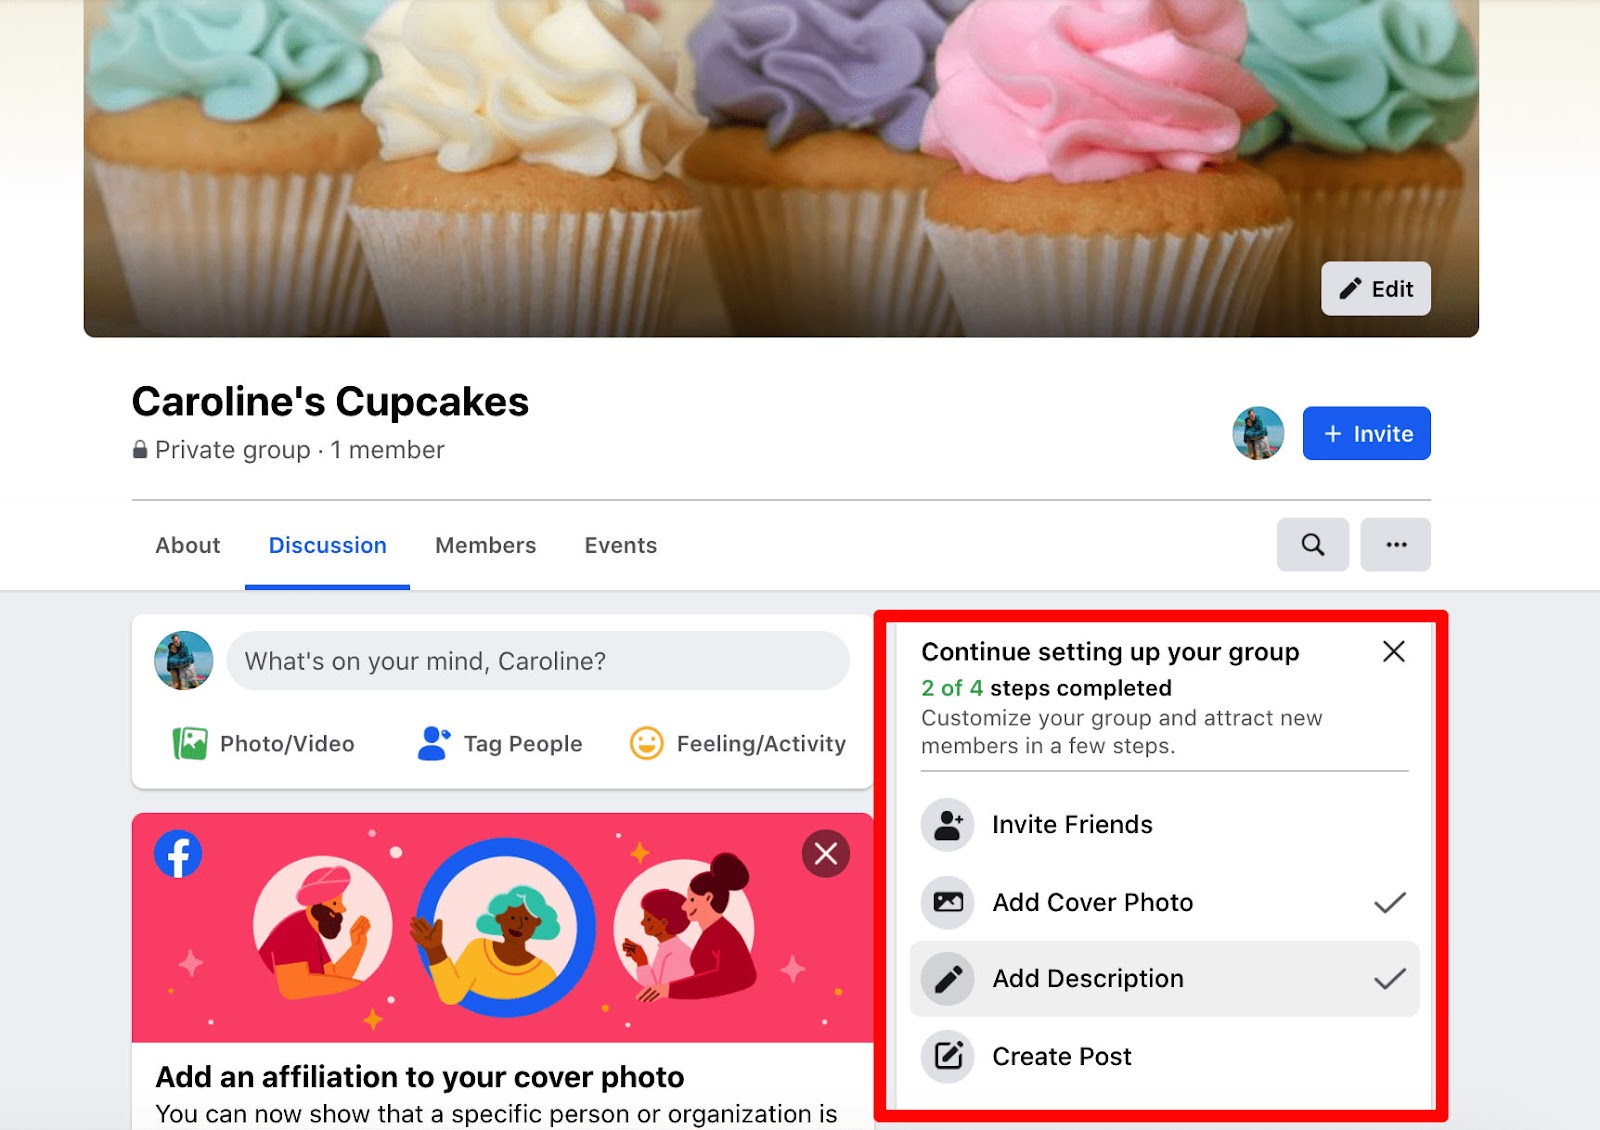
And that’s it! Your Facebook Group is now ready-to-go.
However, to encourage strong retention and engagement, you’ll want to be an active community lead. To pin posts, create a poll in the group, and more, keep reading.
How to Pin a Post in a Facebook Group
A pinned post is a post that will remain at the top of your group’s timeline for seven days (unless you unpin before then).
This is important if you‘ve posted content to encourage engagement. For instance, if you’ve posted an Ask Me Anything, you might want to pin that post to ensure users can find it easily even once group members start posting their own content on the timeline.
Additionally, if you‘ve posted to welcome new members to the community and provide some necessary information on your group, you might want to keep that post pinned to ensure new users have the right context as soon as they jump into your group for the first time (of course, you’ll also want to provide context in your description, as well).
1. To pin a post, you‘ll first need to type your message into the “What’s on your mind“ box, and then click ”Post”.
2. Once the post is published, click the three dots at the top right of your post and select “Mark as announcement”:
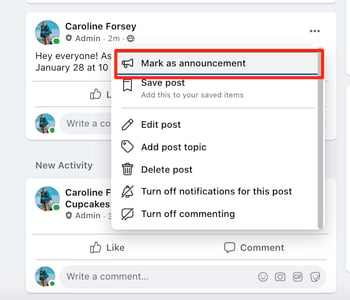 And that’s it! Your post is now pinned to the top of your timeline for the next seven days.
Next, let’s dive into how you can create a poll in your new group.
How to Create a Poll in a Facebook Group
1. To create a poll in a Facebook group, start by clicking into the “What’s on your mind?” box. Then, click on the three dots that say “More”: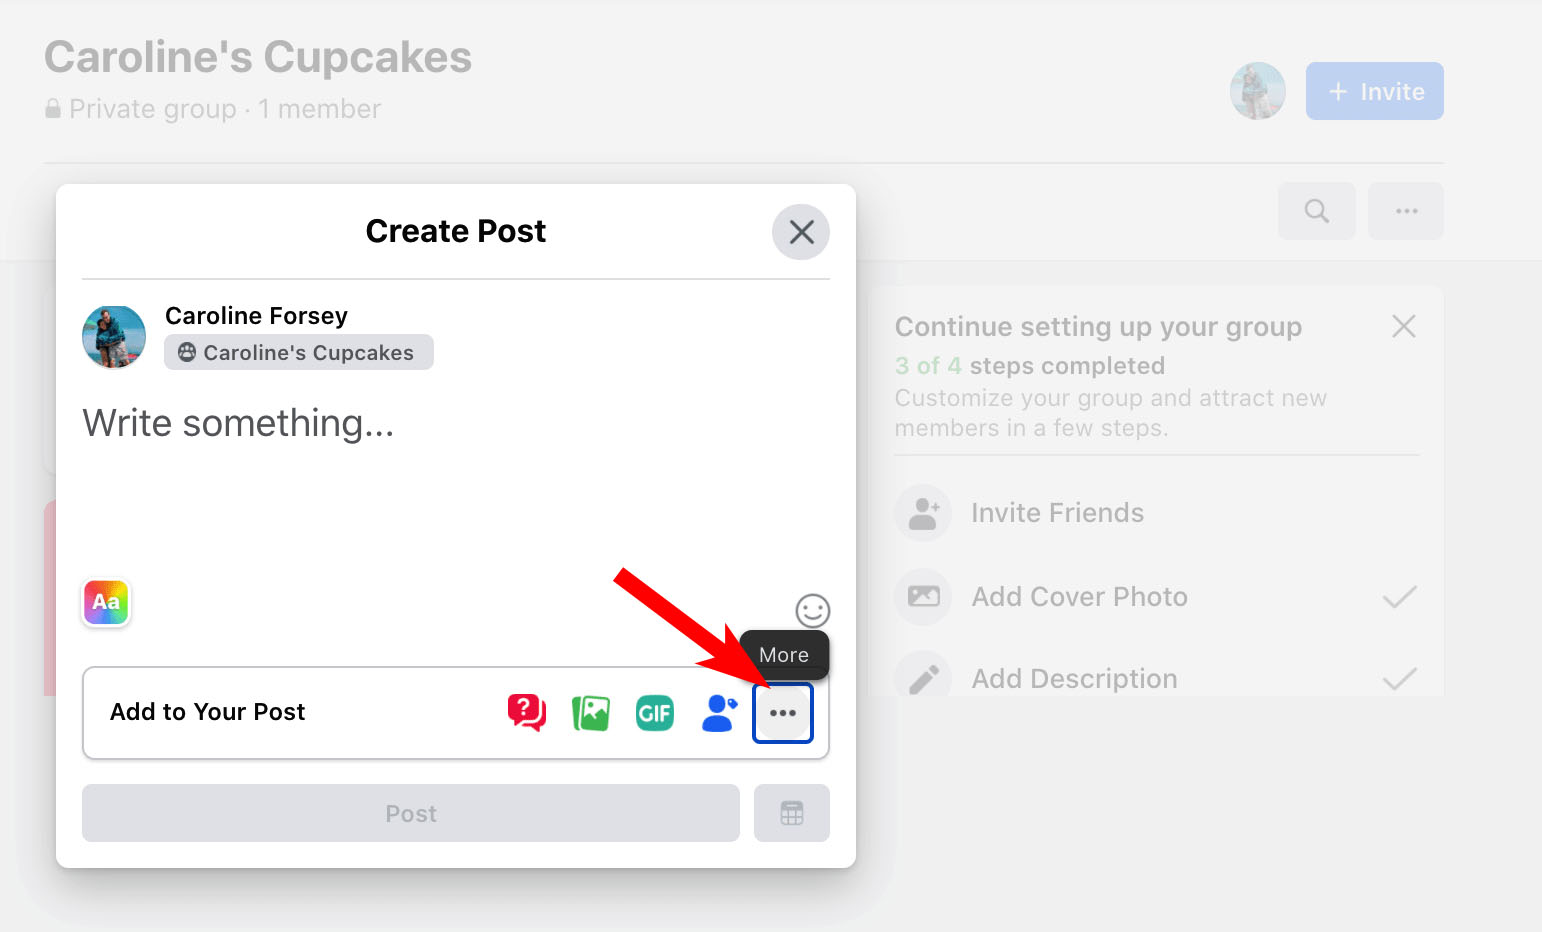
2. Next, click “Poll” out of your menu options.
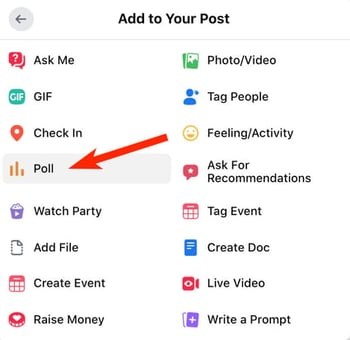
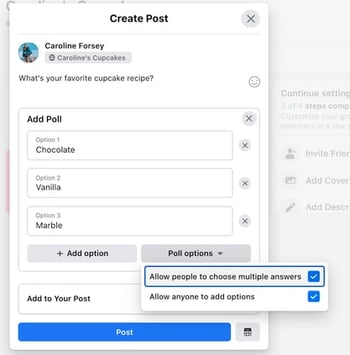
3. Type your poll question into the text space, and then add your individual options into each text box. Click “Poll options” to fine-tune your poll. When you’re ready, click “Post” to immediately publish your poll.
How to Create a Private Facebook Group
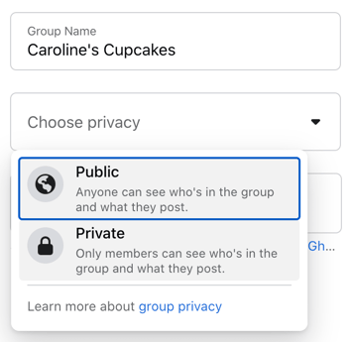
1. You have the option to create a Private or Public Facebook group when you’re first creating a group:
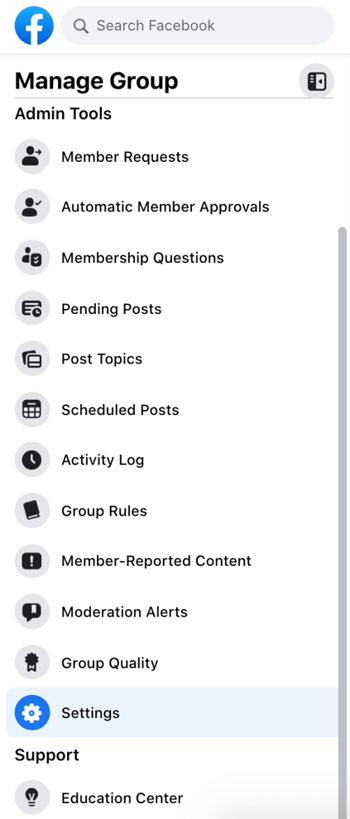
 2. However, if you created a public Facebook group and now want to make it private, you can do that by clicking “Settings” under “Manage Group” (from within your group):
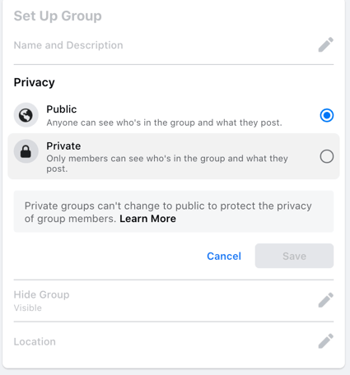
 3. Next, click the pencil besides “Privacy” and click on the “Private” bubble (Note: It takes three days to change a group from public to private):
To learn more about the benefits of having a private Facebook group, read about how HubSpot made the decision to make its own private Facebook group — plus, why the social team feels the Facebook group is critical for facilitating deeper, more meaningful connections between HubSpot users and the industry as a whole.
Facebook Group Management Tips
1. Manage your Facebook Group effectively.
There are Facebook Groups for just about every niche you can think of. Whether your community is dedicated to sharing memes, posting gardening tips, or being a fan page for a band, you’ll want to set up rules for your group members, admins, and moderators.
What these rules consist of is completely up to your group admins, but you should note that Facebook‘s policies supersede any rules you make. It’s in your group’s best interest to review Facebook’s policies to be sure you understand them and abide by them to avoid suspension or deletion of your group.
So you’ve created your Facebook Group, set up some rules, and invited a few initial members. Where do you grow from here? The most straightforward way to grow your Facebook Group is to invite friends who you think would be interested in the community.
2. Grow your Facebook Group.
Another way to grow the group would be to make it public, if it‘s private. This way, your group’s content has a greeter chance of getting picked up and promoted through the algorithm so that other Facebook users can come across it, engage, and join the community.
If your brand is influential on other social media platforms, be sure to invite them to join the Facebook Group as well to continue the conversation.
3. Beware the benefits and challenges of having a Facebook Group.
The benefits of having a Facebook Group are plentiful, but you should always weigh the pros and cons of this undertaking.
You‘ll be responsible for monitoring the content users post to the group, comments that are published, and media that gets shared. If you have admins and moderators this responsibility can be split among several people. That means you’ll have to make sure the rules are enforced justly and everyone is on the same page—no pun intended.
Consider whether you have time to manage this, how you‘ll course correct in the event something goes wrong, and how you’ll scale your team and policies as the group grows.
Continue the Conversation in Facebook Groups
You’re now on your way to engaging with leads, prospects, or customers directly within your Facebook group to increase brand loyalty and value.
This post was originally published in April 2021 and has been updated for comprehensiveness.
This article was written by a human, but our team uses AI in our editorial process. Check out our full disclosure to learn more about how we use AI.

Credit: Source link

![How to Create a Facebook Group for Your Business [+ Why You Should] How to Create a Facebook Group for Your Business [+ Why You Should]](https://blog.hubspot.com/hubfs/Copy%20of%20Featured%20Image%20Template%20Backgrounds-Jun-30-2023-05-58-51-2746-PM.png#keepProtocol)


