Posting to Instagram from your computer is a great choice if you don’t have your phone on hand or need to access company assets on your laptop. Or you might simply prefer to use a wider screen.
For these reasons and others, you might be wondering, “Can I post to Instagram from my computer?” We have some good news.
In this post, we’ll discuss:

Can you post to Instagram from a PC?
Yes, you can post images and videos on Instagram from your PC, however, there are some limitations to keep in mind. The desktop version only allows for posting to your profile, meaning you can’t post Instagram Stories, IGTV posts, or Reels from a PC at this time. Live video is also not supported from the web version of Instagram.
Why post on Instagram from your computer?
Instagram is a popular social media network for sharing photos that’s most commonly accessed through a mobile app. It offers a web version that makes it easy to post assets you may only have on your laptop and not your phone.
Here are some reasons why you should consider posting from your computer:
Manage Multiple Accounts
If you manage multiple Instagram accounts, it’s much easier to switch between accounts on your computer.
For example, let’s say you’re a social media manager for a prominent brand. The last thing you want to do is have an absentminded mishap where you accidentally post brand content to your personal Instagram account (or, worse, vice versa) simply because you’re logged into both on your phone.
Access to Photos and Videos
For those who already work on their desktop for most of the day, it might be easier to upload company posts and videos via your desktop, rather than having your smartphone open at work.
Plus, your company’s files might be more easily accessible via desktop than mobile. For instance, if you use Photoshop to edit company photos, it’s likely easier to click “Upload” from your desktop when you’re done editing, rather than sending that same photo or video to your personal phone.
Keyboard Access
Typing out long captions can be very tedious, especially when using a smartphone. Having access to a keyboard makes crafting your captions and hashtags a lot easier — and quicker.
Using a desktop also means you don’t have to worry about your phone accidentally auto-correcting your caption. Plus, you can run your caption through an AI writing assistant, like Grammarly, to ensure your captions are free of spelling and grammar mistakes.
Bigger Screen
Perhaps you simply prefer the larger screen of a desktop. Or, maybe you don’t have access to a smartphone so you can’t download the app on your phone. Either way, working with a larger screen can be more convenient for those who want to see their picture or videos in greater detail before posting.
Now that we’ve discussed why you should use Instagram on your computer instead, here’s how to do it.
How to Use Instagram on a PC
You can use Instagram on a PC. Simply access the Instagram website at instagram.com and login using your phone number, username, email, or Facebook account. On Instagram’s web version, you can browse your feed, reply to direct messages (DMs), view your notifications, post photos and videos to your profile, and more.
While the social platform is primarily meant to be consumed in-app, it offers a nearly identical experience if you access it on your computer.
On Instagram’s web version, you can:
- Watch and reply to other people’s Stories
- Search for hashtags and other users
- Browse your feed
- Comment and like posts
- Reply to direct messages (DMs)
- View your notifications
- Access the Explore tab
- Post photos and videos to your profile
In other words — Yes, you can post to Instagram from your PC or Mac desktop instead of on your mobile device’s app or browser.
Now, let’s explore how you can post images and videos from your desktop computer.
How to Post to Instagram from Desktop PC
- Open up your preferred desktop browser.
- Go to instagram.com.
- Login to your account using your email, phone number, username, or Facebook credentials.
- Click the ‘+’ button in the top bar.
- In the pop-up, click ‘Select from computer.’
- Choose an image file to upload to Instagram.
- Optional: Crop the image, zoom in, or add more media if needed.
- Optional: Choose a filter and make additional adjustments.
- Write a caption.
- Optional: Add a location, add alt text, or turn off commenting if desired.
- Click ‘Share.’
- Done! You’ve posted on Instagram from your PC.
1. Open up your preferred desktop browser.
Whether you use Chrome, Safari, Firefox, or another application, the first thing you need to do is open your web browser.
2. Go to instagram.com.

Next, go to https://www.instagram.com by typing it into your navigation bar.
3. Login to your account.
Then, log in to your Instagram account through your Facebook credentials or by inputting your phone number, username, or email.
4. Click the ‘+’ button in the top bar.
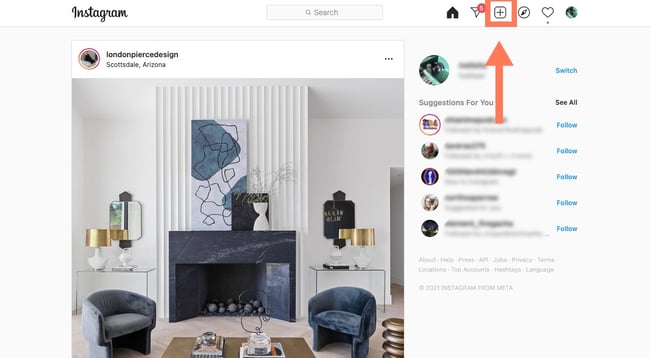
Once you’re logged in, find the navigation bar, which includes a search bar, a home symbol, a DM symbol, a plus sign, a heart, and a circle with your profile picture. Click on the plus sign.
5. In the pop-up, click ‘Select from computer.’
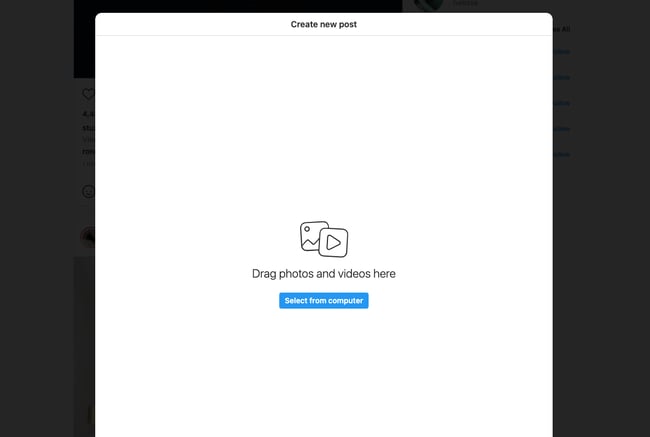
A pop-up box will appear with a blue button that says “Select from computer.” You can either click on the button to select your file, or you can drag and drop images from your desktop into the pop-up box.
6. Choose an image file to upload to Instagram.
If you opt to click the “Select from computer” button, browse through your files until you find the image you want. Click on the image file, then select “Open.”
7. Optional: Crop the image, zoom in, or add more media if needed.
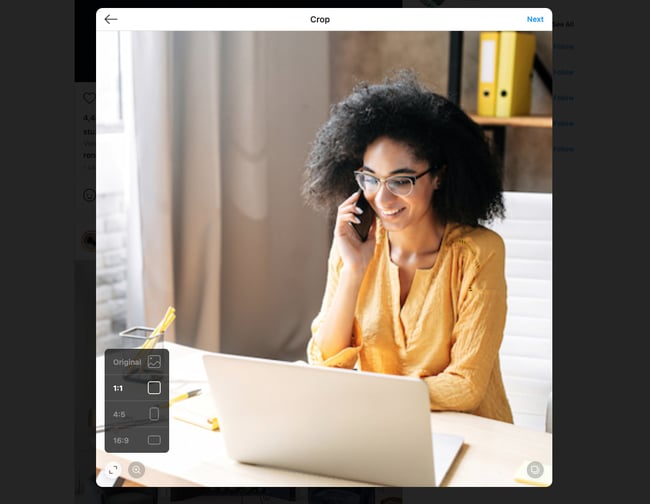
Instagram gives you several options for editing images prior to publication.
You can change the aspect ratio, zoom in, or add more media to the same post. You can find aspect ratio and zoom-in icons on the lower left corner of the image editor:
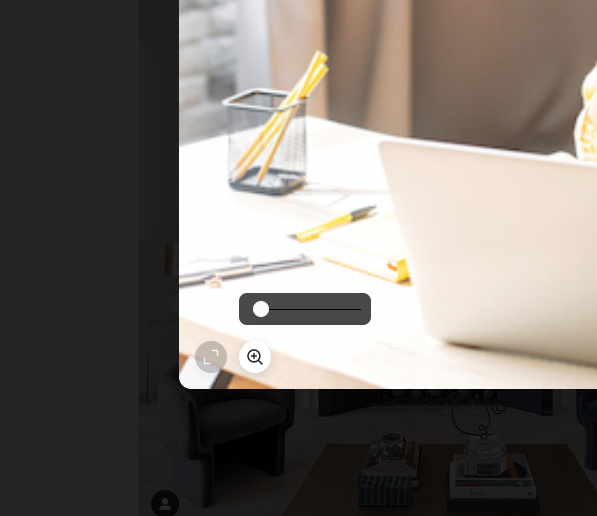
The “add more media” button is on the lower right corner. After clicking on the “add more media” button, click the plus sign to add more images, if desired.

Once you’re done, click “Next” on the top right corner of the image editor.
8. Optional: Choose a filter and make additional adjustments.
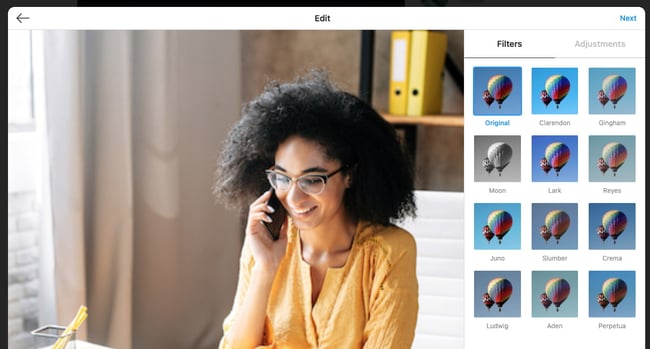
Just like the app, Instagram on desktop also allows you to choose a filter and make additional adjustments to other aspects of the image, such as brightness, contrast, saturation, and more.
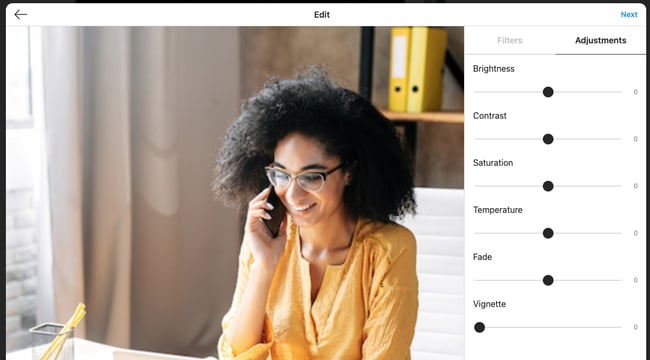
When you’re done editing, click “Next.”
9. Write a caption.
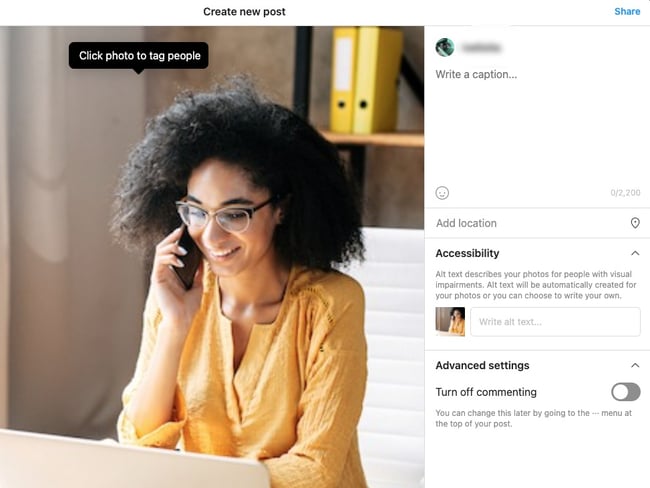
On the next page, you’ll be able to add a caption for your post.
10. Optional: Add a location, add alt text, or turn off commenting if desired.
On the same page, you’ll also be able to add a location, alt text, tag other accounts, or turn off commenting.
11. Click ‘Share.’
Once your post is ready to go, click “Share” on the top right corner of the screen.
12. Done! You’ve posted on Instagram from your PC.
Now that you know to post on Instagram from a PC, we’ll discuss how to do it on:
Once we discuss how you can post photos, we’ll also discuss how to upload a video to Instagram from your desktop.
How to Upload Photos to Instagram on a Desktop Computer Using Chrome
- Open up your Chrome browser.
- Navigate to Instagram’s website.
- Click the ‘+’ button next to the DM symbol.
- Click ‘Select from computer’ to upload your media.
- Crop the image, zoom in, or add more media if needed.
- Choose a filter or make adjustments.
- Add a caption, location, alt text, and tags.
- Click ‘Share.’
1. Open up your Chrome browser.
The first thing you’ll want to do is open up Google Chrome. If you’re on Windows, you can do so by clicking the Windows icon in your taskbar. Then, search through the applications you’ve already installed on your computer until you find Chrome.
2. Navigate to Instagram’s website.
Next, navigate to https://www.instagram.com by typing it into the navigation bar. Log in using your Facebook credentials or by inputting your email, phone number, or username. If you’ve logged into Instagram’s web version before, it might include an option to “Continue as [username],” and you’ll be able to automatically log in.
3. Follow steps 4-12 from the instructions above.
Once you’re logged into Instagram on your Chrome browser, you can upload to Instagram just as you would on any Desktop PC browser. Click the “+” button, select the file you want to upload, edit the photo however you like, write a caption and alt text, add a tag and location, and then click “Share” when you’re ready to upload.
How to Upload Photos to Instagram on a Mac Using Safari
- Open up your Safari browser.
- Navigate to Instagram’s website.
- Click the ‘+’ button next to the DM symbol.
- Click ‘Select from computer’ to upload your media.
- Crop the image, zoom in, or add more media if needed.
- Choose a filter or make adjustments.
- Add a caption, location, alt text, and tags.
- Click ‘Share.’
1. Open up your Safari browser.
The first thing you’ll want to do is open up Safari. To do so, open up Launchpad and find Safari in your list of applications. Alternatively, if you have it pinned in your taskbar, you can open it from there.
2. Navigate to Instagram’s website.
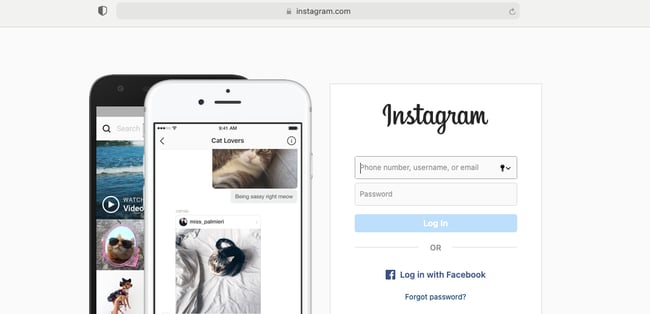 Next, navigate to https://www.instagram.com by typing it into Safari’s navigation bar. If you visit the site often enough, Safari may also have a shortcut in your “New tab” page.
Once you get there, login with your preferred credentials. If you’ve already used the web version in the past, Instagram will allow you to log in with one click.
3. Follow the same upload instructions from before..
Once you are able to view Instagram from your Safari browser, you can upload an Instagram post the same way you would on Chrome — by clicking the “+” button, adding a filter or editing the photo, adding a location and caption, and clicking “Share” when you’re ready for your post to go live.
Want to upload a video instead?
How to Post a Video to Instagram Using a Desktop Computer
You can upload videos to Instagram from your desktop — which makes it easy to share professionally-shot videos that may not be readily available on your phone. That means you can share marketing videos and shoots you received from a freelancer or your in-house videographer.
Here’s how to post a video to Instagram on any web browser.
1. Head to the Instagram website on your preferred browser.
Once you’re there, log in using your credentials.
2. Click the “+” button next to the DM symbol.
Just like you would if you were posting a photo, click the + button in the top navigation bar of your Instagram feed.
3. Click “Select from computer” to upload your media.
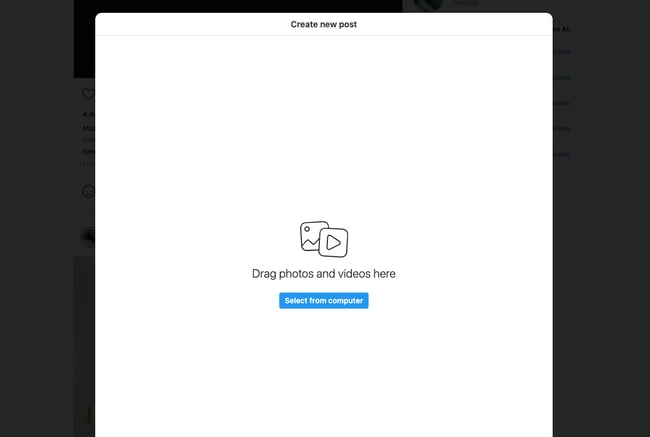
Select your video file from the computer. We recommend uploading an MP4 file to avoid compatibility issues.
If your video is less than 10 minutes long, your file size should be no bigger than 650 MB. For videos between 10 minutes and 60 minutes (which is the maximum length), you should aim for a file size smaller than 3.6GB. Read more about Instagram’s video requirements here.
4. Resize your video and add more media if desired.
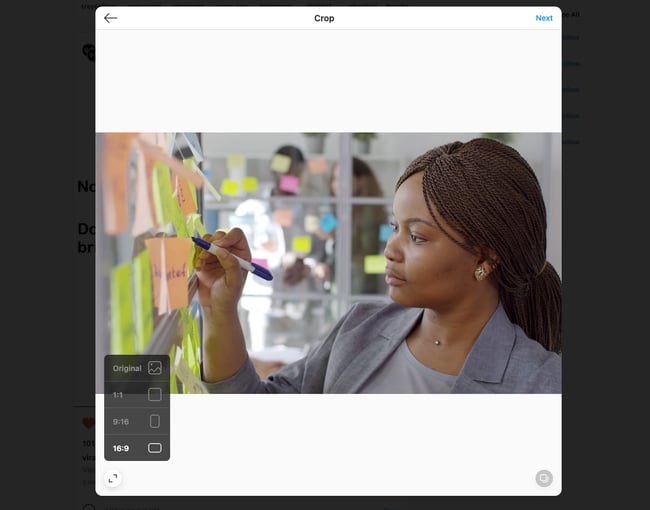 Instagram gives you two options for adjusting your video: Changing the aspect ratio and adding more media. For photos, Instagram also allows you to zoom into the picture. The option isn’t available for videos.
If you’re uploading a horizontal video, we recommend using a 16:9 aspect ratio so that it’s not cut off. If you’re worried about the aesthetics of your feed, stick to a 1:1 ratio. That way, there isn’t any white space when visitors visit your profile.
5. Choose a cover photo, trim the video, and toggle sound options.
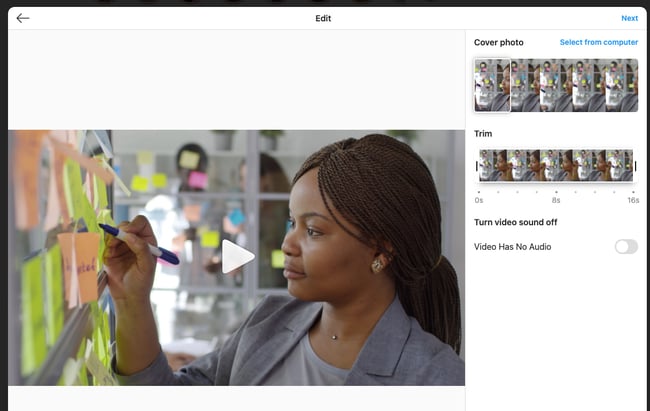
Next, you can choose a cover photo (the image users will see before they click “Play”). You have the option of uploading a custom cover photo for the video, and you can also trim the video and turn the sound off if desired.
6. Write a caption, tag other users, add alt text, and toggle commenting options.
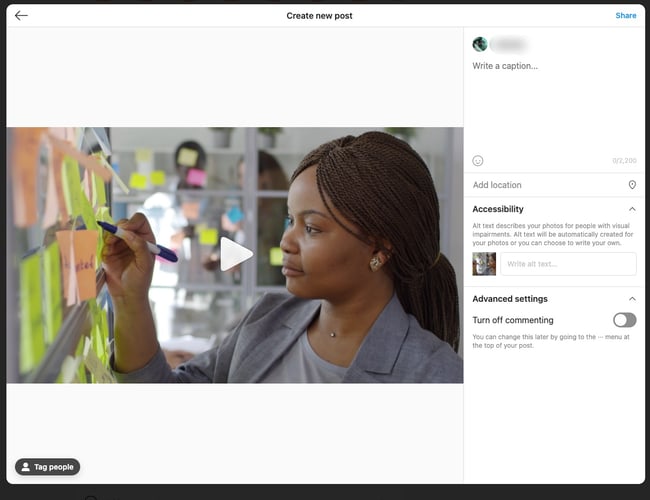 In the next screen, you can write a caption for your video, tag anyone who appears in the video, add alt text, and disable commenting.
7. Click Share.
Done! You’ve now posted your video on Instagram.
Alternative Ways to Post to Instagram from Your Computer
You don’t have to access Instagram’s web version to post on Instagram. If you find the web version to be too lacking for your day-to-day tasks, especially if you’re a social media manager, you can use a third-party service that offers social media scheduling software.
HubSpot’s social media management tool is one of the best options you can use to schedule Instagram posts from your desktop — no need to access the Instagram app or website itself.
Here’s one example of us scheduling a video post for Instagram using Social Inbox:

The great benefit of using this method is that you can schedule posts well in advance. You don’t have to access Instagram every time you want to add new media to your profile.
If you’re doing this regularly for your job, it might be worthwhile to explore all the social media scheduling tools at your disposal to choose the one best-suited for your business’ needs.
Using Instagram Like the Pro You Are
Now that you don’t have to worry about transferring photos to your mobile device or juggling your work’s social media account on your own device, you’ll be able to grow on Instagram efficiently and effectively. From there, the sky is the limit for creating posts and growing your audience in a scalable way.
Editor’s note: This post was originally published in October 2020 and has been updated for comprehensiveness.

Credit: Source link

![How to Post to Instagram From Your Computer [12 Easy Steps] How to Post to Instagram From Your Computer [12 Easy Steps]](https://blog.hubspot.com/hubfs/how-to-post-to-instagram-from-your-computer.jpeg#keepProtocol)


