To enjoy Excel fully, you must know how to use the IF-THEN function.
![Download 10 Excel Templates for Marketers [Free Kit]](https://no-cache.hubspot.com/cta/default/53/9ff7a4fe-5293-496c-acca-566bc6e73f42.png)
The IF-THEN is one of Excel’s most impressive functions, as you can use it to analyze data, draw inferences and make decisions under certain preset conditions. But what exactly are IF-THEN statements, and how can you start using them?
In this guide, we’ll show you how to use IF-THEN statements to improve your mastery of Excel.
Table of Contents
What are IF-THEN Statements in Excel?
IF-THEN statements are functions in Excel that return a unique set of actions after your preset condition is met.
Simply put, when you use the “If” statement, you’re setting a condition and instructing Excel to perform a unique set of actions when your preset condition is true and another when the condition is false.
To use the “If “ function in Excel, you start by writing the equal sign (=), followed by “if,” then your condition, and a two-part syntax instructing the program on what to do when your requirements are or aren’t met.
The syntax usually looks like this:
- =IF(logical_test, [value_if_true], [value_if_false])
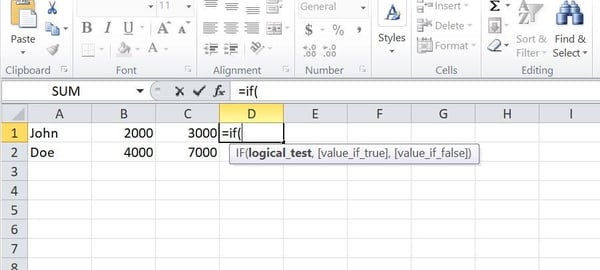
The “If” function is handy, especially when you have a large data volume and want to avoid the stress of computing formulas for each data. Here’s an example of how simple it is to use IF-THEN statements in Excel:
In this example, I have a spreadsheet containing three columns of data. Where column A contains name data, and columns B and C, contain integer data.
Using the If function, I set a condition using the syntax:
- =IF(B1>C1, “yes,” “no”)
This function initiates a command telling the Excel program to test if the data value in cell B1 is greater than the data value in cell C1.
I’ve simply instructed Excel to give me a response of “yes” under the condition that the value of cell B1 is greater than cell C1 and a response of “no” under the condition that the value of cell B1 is less than the value of cell C1.
I then extended this function to the other respective cells using a simple autofill trick. Check out our guide on using Excel like a pro for some helpful tricks to make your Excel experience easier.
It’s important to note that the IF-THEN statement only allows you to set a condition for two variables. That means you can only set conditions including, say, the data value in cells B1 and C1 or a condition including data values in cell B1 and a defined integer or text.
For example, you can set a condition instructing Excel to return a response of “Yes” if the value in cell B1 is greater than the value of cell B2 as shown in the example above. Or, you can set a condition asking Excel to return the response ”yes” or “no” if the value of cell B1 is greater or less than 1000.
Here’s a quick example:
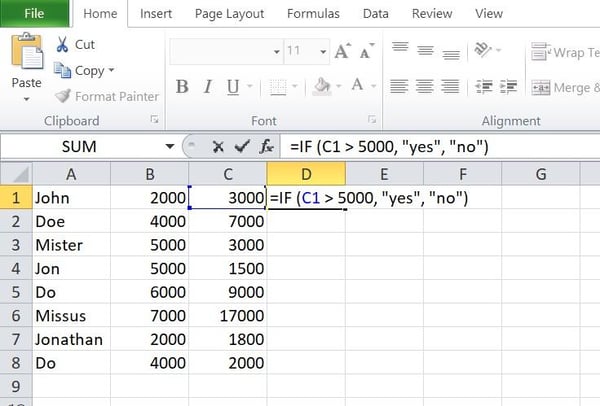
Here, I told Excel to return the response “yes” if the data value in cell C1 is greater than 5000 and “no” if the value is less than 5000.
Here’s the response Excel returned:
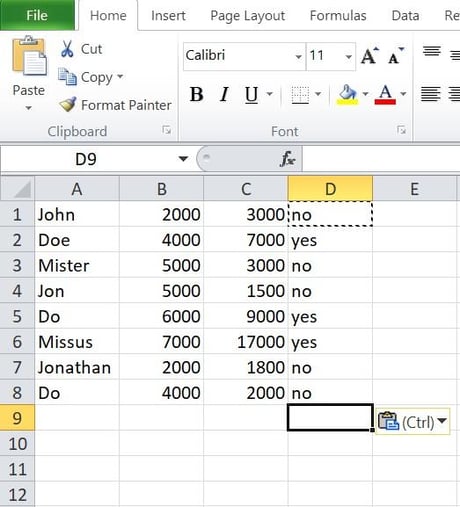
As mentioned earlier, the IF-THEN statement is a powerful Excel function with numerous benefits. Learning to use this function properly will astronomically increase your mastery of Excel.
The Benefits of IF-THEN Statements In Excel
Here are some benefits that IF-THEN statements in Excel can offer you:
Checking for Errors in Data
You can use IF-THEN statements to check for errors when inputting data into the spreadsheet.
For example, if you feel like you have made a mistake by inputting a number instead of a text into your spreadsheet, you can check using an if function:
- IF(B1 = “”, “Text”, “Number”)
Calculating Debt Schedule or Depreciation Schedule
Financial Analysts can use IF-THEN statements to calculate debt and depreciation schedules.
Using the IF-THEN statement, you can set conditions asking the program to return a response for months with outstanding balances and even draw up a repayment schedule.
For Budgeting
As a financial analyst, using IF-THEN statements would make budgeting easier. IF-THEN functions will allow you to create up to 64 conditions, which can assist you in your budgeting process.
To Organize Data
The primary ability of IF-THEN statements is setting instructions under certain conditions. Thus it’s easy to organize data in your spreadsheet under certain conditions using if statements.
You can set conditions for a particular cell box or multiple cells and organize your spreadsheet data under said conditions.
Works Well With Other Formulas
An exciting advantage of IF-THEN statements is their flexibility. Due to its flexibility, you can use IF-THEN statements with other formulas in Excel.
For example, you can use it with the DATEVALUE() function, the SUM() function, or even the COUNT() function.
How to Use IF-THEN Statements in Excel
Now that you know what an IF-THEN statement is and how it can benefit you, the next step is knowing how to use it properly.
There are two methods to use the function, and we’ll start with the basics. First, here’s a simple step-by-step procedure for writing IF-THEN statements in Excel.
Step 1: Click on the cell you wish to format, say cell A1.
Step 2: Write the IF-THEN function formula directly into the cell box.
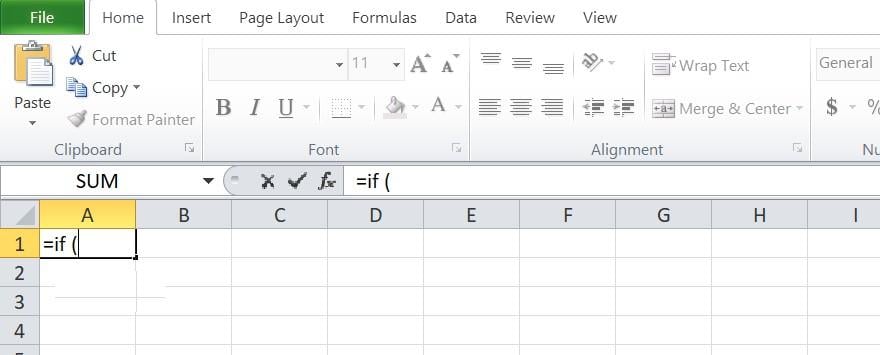
Or in the formula box. 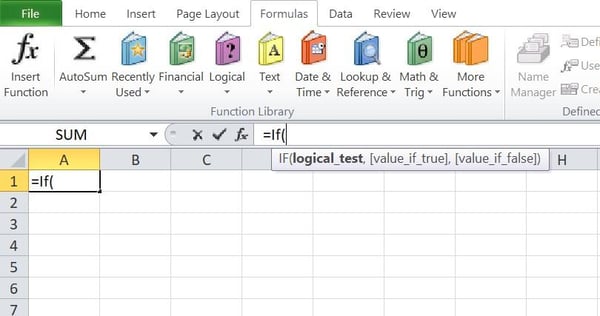
Step 3: Begin writing your conditions and expected responses to said conditions.

Remember: Always start the formula with an “equal” sign and input the appropriate punctuation so you don’t get an error message after inputting the function.
Here’s an alternative step-by-step you can use.
Alternative Step 1: Click on the “Formulas” tab in the taskbar menu of your Excel program.

Alternative Step 2: Click on the “Insert Function” option, which will launch a dialog menu:

Alternative Step 3: Select “IF” from the list of options in the dialog menu and click “OK.” It will launch a dialog box.
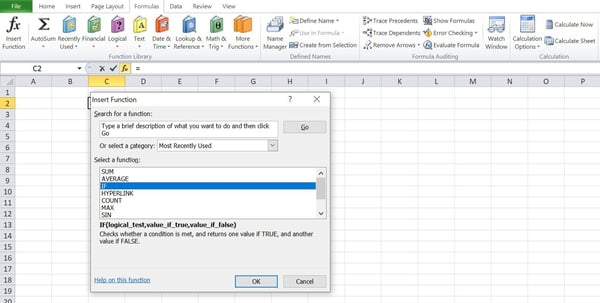
Alternative Step 4: In the dialog box, input your condition and instructions telling the program what answers to return when the condition is met and when it isn’t met.
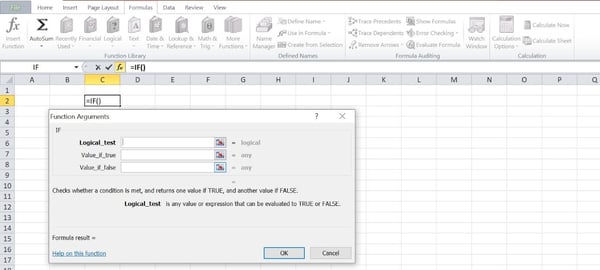
Note: It is better to use the “Insert Function” method if you’re writing a simple IF-THEN function, as it launches a formula builder that will help you eliminate the risks of errors when inputting your formula.
This method will automatically input the appropriate punctuations and formats and only require you to input your conditions and instructions in the three fields of the dialog box.
Now that you know how to start with the IF-THEN function, let’s review the other use cases for if functions.
Writing IF-THEN Function for texts

IF-THEN functions for texts are regular IF-THEN functions, but in this case, the function tests for a string of text and then returns a preset response depending on whether the condition is fulfilled.
Using the IF-THEN function is quite simple, and we’ve touched on it a few times in the examples so far. However, here’s a step-by-step procedure for writing IF-THEN statements in Excel with text.
Step 1: Click on the cell box where you want to insert the function.
Step 2: Write the “equal” (=) sign.
Step 3: Start writing the if statement, along with the conditions for the test and the responses to be returned.
Step 4: After writing the if statement, click enter.
Here’s an example showing how to generate a remark stating who passed or failed a course for a first-year class using IF-THEN statements in Excel with text:
In this example, using the IF-THEN function:
- If(B2 = “Pass,” “Scored above 50”, “Didn’t score above 50”)
The program was asked to return a response of “Scored above 50” or “Didn’t score above 50” if the string of text in cell B2 is equal to “Pass.”
However, we can test the other way around using the function:
- If(B2 <> “Pass,” “Scored above 50”, “Didn’t score above 50”)
The program was asked to return a response of “Scored above 50” or “Didn’t score above 50” if the string of text in cell B2 is not equal to “Pass.”
Note: Always insert double quotation marks when stating your text parameters.
IF-THEN statements are case-insensitive unless otherwise stated.
To make an IF-THEN statement case-sensitive, you must precede your condition parameters with the word “EXACT.” Using the example above, Excel will test for uppercase text with this formula:
- IF(EXACT(B2, “PASSED”), “Scored above 50”, “Didn’t score above 50”)
Writing IF-THEN Functions for Numbers
You must know the basic Excel operators and their signs before writing IF-THEN statements in Excel for numbers. Here’s a guide to Excel that will help you learn the basic Excel formulas, operators, and more.
Follow these steps.
Step 1: Click on the cell box where you want to insert the function.
Step 2: Write the “equal” (=) sign.
Step 3: Start writing the if statement, along with the conditions for the test and the responses to be returned.
Step 4: After writing the if statement, click enter. Your formula should look like this:
- IF(B2>=50, “Passed”, “Failed”)
Using the function above, we can write an IF-THEN statement to check if a student passed or failed a course. Here’s an example:

This function sets a condition to test if cell B2 contains an integer value greater than or equal to 50. If this condition is met, the program will return a response of “Passed” and a “Failed” response if the condition isn’t met.
Note: IF-THEN functions do not only work for integers. They can also work for real numbers and negative numbers.
Writing IF-THEN functions for dates
One of the unique forms of writing IF-THEN functions is the date format. Many people may think they can write IF-THEN functions for dates like they write IF-THEN functions for numbers.
Unfortunately, that is not so.
Since the Excel program cannot read the regular date format of mm/dd/yyyy, you’ll have to insert the “DATEVALUE” function into your IF-THEN function to make the Excel program know that you’re testing a date condition.
Your function should look like this:
- IF(B2>=DATEVALUE(“mm/dd/yyyy”), “yes,” “no”)
Here’s a step-by-step procedure on how to use this in your spreadsheet:
Step 1: In your spreadsheet, click on the cell where you want to input the function.
Step 2: Write the “equal” (=) sign.
Step 3: Start writing the if function. Your syntax should look something like this:

Step 4: Click Enter on your keyboard, and the function will return a status response of either “Released” or “Unreleased.”

The function above tests whether the date in cell B2 is greater than the 11th of April 2023. The function will give a “Released” or “Unreleased” response depending on whether the conditions are met or not.
Note: You can set the IF-THEN function to compare against the current date by inputting the TODAY() function into your IF-THEN function.
This is what your function should look like:
- IF(B2>TODAY(), “Released”, “Unreleased”)
Writing IF-THEN Functions for Multiple Conditions (Nested IF statements)
Multiple IF-THEN statements or Nested if statements, as commonly called, allow you to add multiple if statements into one if statement.
A Nested if statement will look like this:
- IF(logical_test, [value_if_true], if(logical test, [value_if_true], if(logical test, [value_if_true], [value_if_false])))
If you wanted to write an IF-THEN function to assign remarks to scores of first-year students in a particular course. Here’s how to do this in a few steps:
Step 1: Click on the cell box where you want to insert the function
Step 2: Write the “equal” (=) sign.
Step 3: Begin writing the IF-THEN function. Your function should look something like this:
- IF(B2>90, “Excellent”, IF(B2>=80, “Very Good”, IF(B2>=70, “Good”, IF(B2>= 50, “Fair”, “Poor”))))

Step 4: Click the Enter key to receive a response to your function.
The function will return a response of “Excellent” for students who score 90 or above; “Very Good” for students who score between 79 and 90; “Good” for students who score 69 and 80; “Fair” for students who score between 49 and 70; and “Fair” for students that score below 50.
Best Practices for IF-THEN Statements in Excel
Here are some practices to follow to get the best out of your IF-THEN functions in Excel.
Always use parentheses.
The best way to avoid errors in your formulas in Excel is by using parentheses. Therefore, if you want your if statement to function properly, ensure you use parentheses correctly.
For example, when writing multiple conditionals or a nested if statement, ensure you use parentheses in the right places to avoid “#NAME?” errors.
Use range instead of cells.
When you use Range instead of Cells, you can avoid errors arising when cell data changes or your formula needs to be adjusted.
Write out each section as its own formula.
It may sound unnecessary, but writing each spreadsheet section as its own formula would make your data more readable and easier to understand.
Another benefit to doing this is that you can find everything you need in one place and edit it according to your needs.
Even more, if there’s an error with your function, writing each section as its own formula makes it easier for you to debug and find any errors in your formula.
Never hesitate to use other formulas.
One fantastic thing about Excel is that it lets you use multiple functions by inserting them into one another.
Like other formulas in Excel, you can insert other functions into your IF-THEN function to get the best out of it.
Using your IF-THEN function alongside other formulas makes it easier to make calculations, saves time (especially when you’re working with large data), and makes it easy to spot any errors.
Getting Started
IF-THEN statements are certain to make your life easier. Although it may be difficult to grasp everything at once, you’ll find it easy with constant practice and continuous use.
So don’t hesitate to visit this guide anytime you face a problematic IF-THEN statement challenge.

Credit: Source link


